Week three, Big Game Project

Animations in Unreal Engine (3D)

Note: This article assumes basic knowledge about the unreal engine 4 framework, including Blueprints.

Unreal uses state machines to power their animation system in their latest engine, as of 2015. They use a visual editor to set up the state machine, at the creators disposal are two different node types. There is the State node and the Conduit node.

Conceptually, it is best to think of a state as just an organized portion of an AnimGraph that we know the character or Skeletal Mesh will be blending into and out of on a regular basis. You can then transition into and out of this part of the graph. For instance, you may have an Idle state for your character’s animation, and that state may just contain a single animation.

Unreal Engine | State Machines. 2015. Unreal Engine | State Machines. [ONLINE] Available at:https://docs.unrealengine.com/latest/INT/Engine/Animation/StateMachines/index.html#states. [Accessed 17 April 2015].

This an explanation that is given by Epic at their website, the Conduit is branching point where it can go from one-to-many or many-to-one. Between the conduits and nodes their is something called a Transition rule which is a blueprint function that returns a boolean value.

Glade’s characters all have the same animation tree. Which includes the ability to use four different attacks, there was complications with this during the development but it was improved upon during week three.

Statemachine

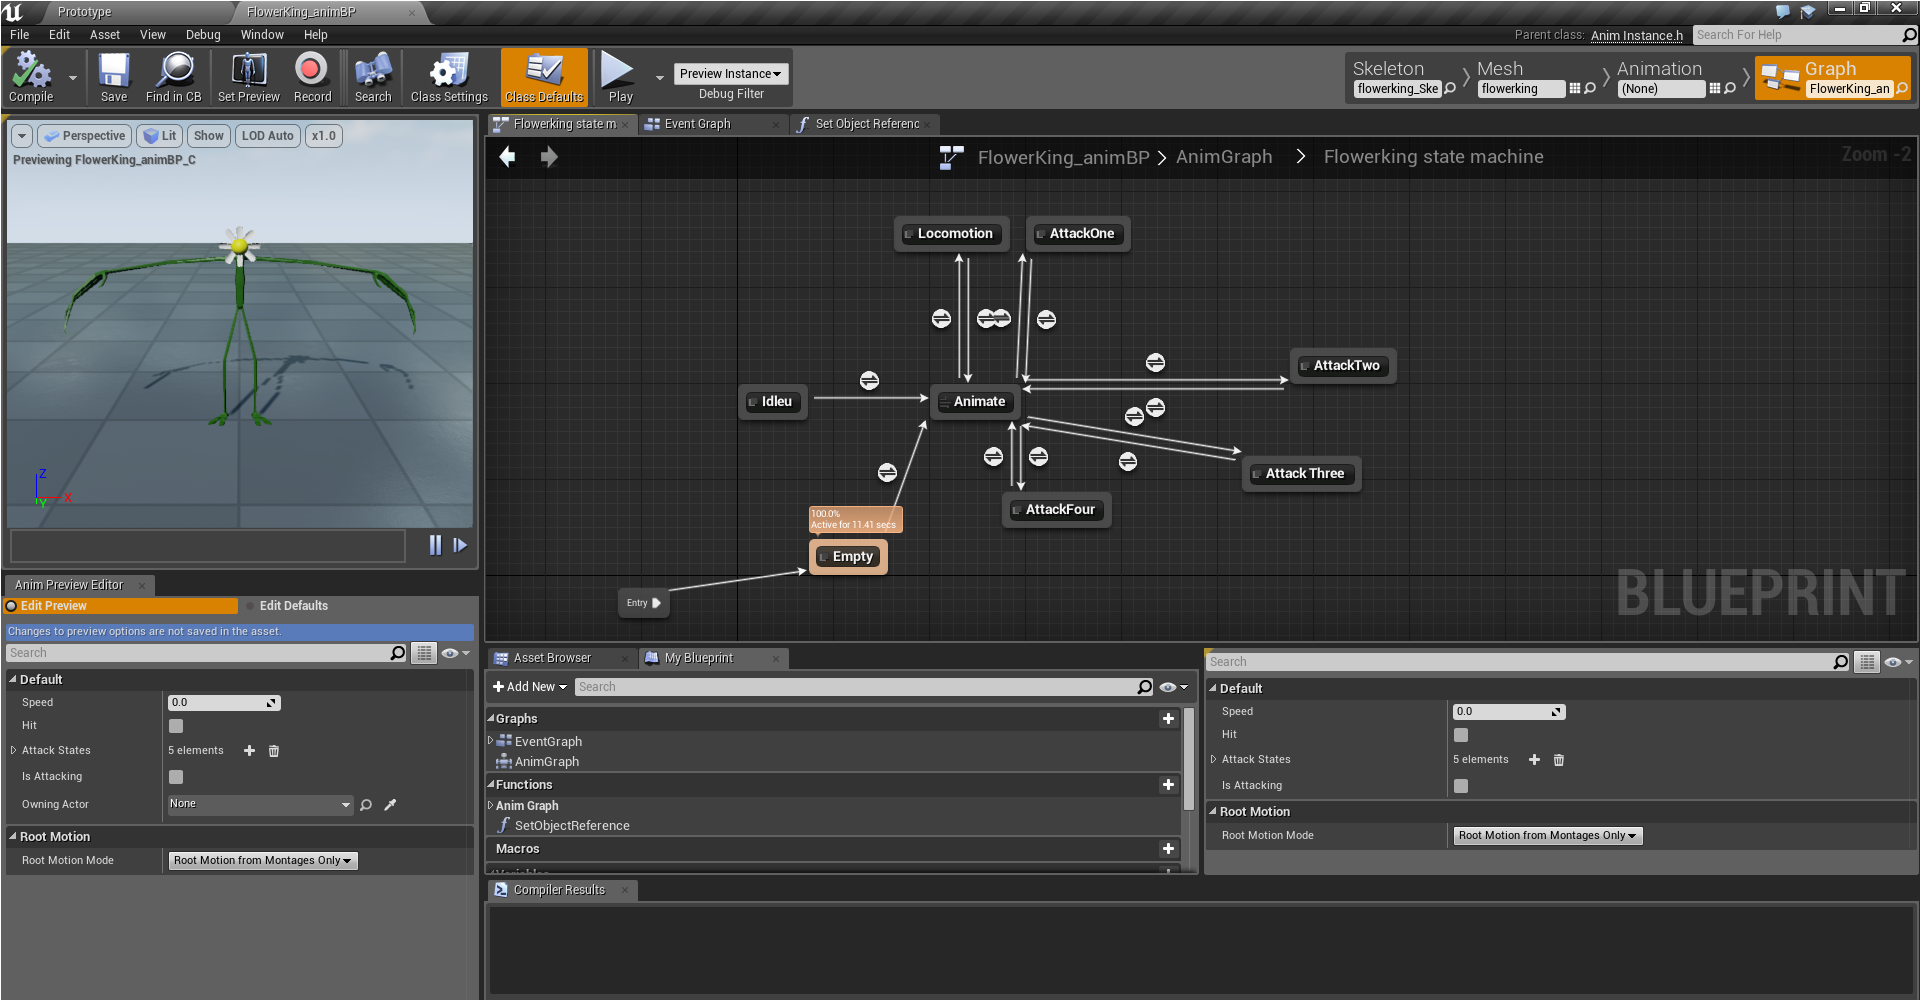
The complication was fixed with the implementation of an index that determines what animation should be used. This is determined during the Animation node.

Combat

Glade is a dungeon crawler with inspiration from Diablo II that features several playable characters, which means that it needs combat that is varied and interesting. To do this the decision was made to create a basic character blueprint that could be extended upon. This blueprint then have four different attack functions that the extended blueprints then inherit and could modify to fit their own attack feedback and game logic.

This meant that after this first base character was created, the workload on creating a new character was minimised to the point of it only needing their own animation blueprint and their own attack implementations.

Unreal engine 4 includes a feature in their animation system that allows the creator to add notifications during the animation. These notifications could be used to create effects/feedback or other gameplay logic.

Notifies

This is where the notifications are created.

Event notifies

This is how the notifications are handled with in the animation blueprint.

Map

During week three there was also some progress on creating the first playable map. Here is an early screenshot of the map.

MapOne

ConfigManager – Reading from files

ExampleLayout

Hello dear readers,

Today I am going to discuss some about my latest contribution to our game project. The ConfigManager, which is a part of the program which keep in mind all the files that have been read and what lines they contain.

I will illustrate how it works with an alteration of the picture above.

LineCheck

PSEUDO CODE

Red lines are ignored.
Green lines are stored in a std::vector¹.

The lines that are stored in the vector is then split at the “=” sign. With the different sides of the “=” sign being different variables.
Left side is the Key variable.
Right side is the Value variable.
For example:
ScreenWidth=1080
Where ScreenWidth is the Key, and the 1080 is the Value.

CODE PART

ConfigmanagerhInitialise

To properly initialise (red boxes) the ConfigManager, I want to set a default directory, from which the files are retrieved. Invalidating any stray files and keeping a clear structure. To do this we look at the blue boxes, where a std::string² variable is declared in the header file and then given a value through the Initalise parameter.

ReadFile

This is the main function (Red) of the ConfigManager, a function for reading a file and store the important parts of it in a dynamic array.
The first part of ReadLine() is just initialisation of variables that is required during the process. However when we reach the green box, that is when we actually do something. Since we start to read through the entire file, While(not end of file), and then we push every line into the temporary vector. 

Then there is not anything interesting until we reach the purple box, where we check if the ‘=’ sign is the last character. If it is not, then we add the Key and the Value to a std::map³. Both which are of type std::string.

GetValueFromKey

The last part is how to retrieve the different values. This is done through std::map’s own find() function. Where the blue box see if the search went through all the keys and did not find the specific key. Though if it did, then it returns the value that is associated with the key.

This is a basic ConfigManager that reads simple input through a file. However it is limited to this exact syntax. Where there is no spaces between the Key and its Value.

WORD EXPLANATIONS

1. A std::vector is a dynamic array of objects. For example, if you have a basket (which would be the vector) and an apple tree with a lot of apples (the objects), and you tried to fill the basket with the apples. The basket would then change its size according to the number of apples in the basket, never allowing you to fill it completely. Illustrated in the series of pictures below.

Apples and the evergrowing basket

2. A std::string is an array of characters, forming a text string. Like “Hello World!”.

3. A std::map is a dynamic array that stores 2 values, a Key and a Value. Where you can retrieve the Value through finding the Key. Like an normal lock, if you do not have the Key, you can not open the lock.

The magic of Sound

Research

While a game can be great without sound, there is something magical within sounds that fill the athmosphere. Which is somewhat needed to give that stillful and lonely feeling that our game needs. With this motivation in mind I set out to create something that could handle all the different sounds in our game in a reasonable fashion.

The thought that came to mind where that we do not want to load the same sound file several time.

To solve this I first checked SFML:s documentation for Sound and Music, to get an understanding of how much support they have for sound and music. They turned out to handle Audio much the same way as they handle Sprites, and if you do not know how they handle Sprites you can read up on it here: http://www.sfml-dev.org/tutorials/2.1/graphics-sprite.php. With one important rule, the Soundbuffer that you attach to the Sound object need to exist as long as you want to use the Sound object, which is another thing that the SoundManager is needed for. To control the lifetime of the SoundBuffers. Depicted in the figures below.

howitworksfigures

When I knew this, it was an easy decision to make the SoundManager much the same way as I did our SpriteManager.

Overview – Initalise and Load

initialiseLoad

* Initalise() – Within the red fields you see the Initialise() function, which has the purpose of setting the path to the directory (giving the folder which contains the audio files).

* Load() – Within the turqouise fields is the definition and declartion of the Load() function, which is the main part of the SoundManager:s purpose. To load a specific file and returning a soundbuffer pointer, which in turn will be used by the entities to create sounds. Inside the light blue field is the check if the file has already been loaded, more on the loading in the next section. If it is already loaded it will be loaded into a SoundBuffer pointer, as seen in the purple box. This SoundBuffer pointer is then returned to the part of the code that called for the function.

Overview – LoadImage and Cleanup

CleanLoadSound

* LoadImage() – The pink boxes contain the definition and declaration of the LoadImage() function, which sole objective is to load a sound file into a sf::SoundBuffer and insert that in the dynamic array of Soundbuffers. This is achieved by first setting a complete file path, Cyan box, and then creating a local SoundBuffer pointer to which you use the “LoadFromFile()” function that is built into SFML, the Grey box. The next step is to make sure the file was actually loaded, the Yellow box, with a simple check if the pointer was nullified or not, and if it is nullified you return false (since the file could not be loaded). The last step is to insert the SoundBuffer in the dynamic array and then return true, the blue box.

* Cleanup() – The black box is the destruction of the class, this is where the dynamic array is cleared and all the pointers are deleted and set to nullptr. All this is done in the brown box. It iterates through the entire array and delete the pointers one by one and sets them to nullptr. After this the only thing left is to use the “Clear()” function to the std::map to reset the dynamic array.

Then voilà a functioning SoundManager.