Christmas Challenge – Day 1 & 2, HUD

Hello everyone, I read about a game development challenge on the Unreal Development facebook group that I found interesting and wanted to try out.

Basically it is that you set aside one hour everyday to develop a game inside Unreal Engine (this is of course optional, it could be any other engine out there including your own). For me this was a prime opportunity to yet again try to dive into the monstrous being that is Unreal Engine but this time during a more lax approach.

So what is my idea? Well I have been urging for a long time now to create a gathering game of sorts, so that is what I will do. It involves gathering resources and creating basic tools and structures to maintain your characters hunger and stamina while at the same time increase its strength to be able to wield better tools and carry more weight.

So today I started with doing two hours instead of one, to make up for yesterday, and I started with following a tutorial on heads up displays in Unreal Engine. However I tweaked about to configure to meet my ends during the tutorial. So thanks to this I did not face any difficulties but had a smooth time throughout the session, adding a inventory, player status bars and an experience pop-up widget.

The plans for tomorrow is to finish up with the HUD and start on the gathering mechanic and adding increasingly higher stamina drain based on the current inventory weight.

As a last note I would like to give a shoutout to my friend Kenth Ljung that has joined me on doing this challenge (you can find his blog in the bottom).

Well have a great evening and hopefully I will give a status update tomorrow.

Kenths dev blog: http://masterkenth.com/gamedev-xmas-challenge-day-1-setup-and-prototyping/


Week three, Big Game Project

Animations in Unreal Engine (3D)

Note: This article assumes basic knowledge about the unreal engine 4 framework, including Blueprints.

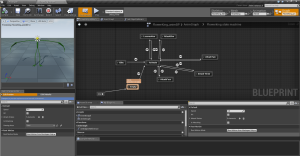
Unreal uses state machines to power their animation system in their latest engine, as of 2015. They use a visual editor to set up the state machine, at the creators disposal are two different node types. There is the State node and the Conduit node.

Conceptually, it is best to think of a state as just an organized portion of an AnimGraph that we know the character or Skeletal Mesh will be blending into and out of on a regular basis. You can then transition into and out of this part of the graph. For instance, you may have an Idle state for your character’s animation, and that state may just contain a single animation.

Unreal Engine | State Machines. 2015. Unreal Engine | State Machines. [ONLINE] Available at:https://docs.unrealengine.com/latest/INT/Engine/Animation/StateMachines/index.html#states. [Accessed 17 April 2015].

This an explanation that is given by Epic at their website, the Conduit is branching point where it can go from one-to-many or many-to-one. Between the conduits and nodes their is something called a Transition rule which is a blueprint function that returns a boolean value.

Glade’s characters all have the same animation tree. Which includes the ability to use four different attacks, there was complications with this during the development but it was improved upon during week three.

Statemachine

The complication was fixed with the implementation of an index that determines what animation should be used. This is determined during the Animation node.

Combat

Glade is a dungeon crawler with inspiration from Diablo II that features several playable characters, which means that it needs combat that is varied and interesting. To do this the decision was made to create a basic character blueprint that could be extended upon. This blueprint then have four different attack functions that the extended blueprints then inherit and could modify to fit their own attack feedback and game logic.

This meant that after this first base character was created, the workload on creating a new character was minimised to the point of it only needing their own animation blueprint and their own attack implementations.

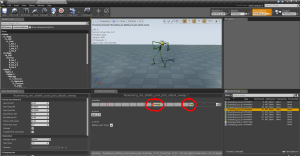
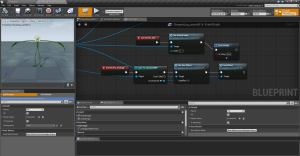
Unreal engine 4 includes a feature in their animation system that allows the creator to add notifications during the animation. These notifications could be used to create effects/feedback or other gameplay logic.

Notifies

This is where the notifications are created.

Event notifies

This is how the notifications are handled with in the animation blueprint.

Map

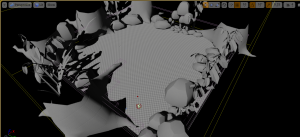
During week three there was also some progress on creating the first playable map. Here is an early screenshot of the map.

MapOne

Template and component system

This week we started a new course called Game Programming III and during the lectures this week we learned about templates, linked lists and binary search tree, but the thing I am going to write about today is templates.

Templates are a method for creating generic functions or classes, and what I mean by generic is that they are type independent. You can use them for integers, floating-point numbers, Booleans etcetera, meaning that the function or the class can be reused instead of writing new classes or functions for every data type.

By using templates I wanted to create a basic Entity Component system, and for those who do not know what a component system is I recommend to read this chapter: http://gameprogrammingpatterns.com/component.html or rather I recommend you to read it all if you already have not because it is a very insightful book.

In short the component system is a way to create entities by adding different components to them, and this way the components only know about themselves and do not care about anything else than themselves. This meant that there was not unnecessary coupling between the classes.

At first templates does not seem to fit in here, but when you lay it down it becomes apparent that system resolves around templates.

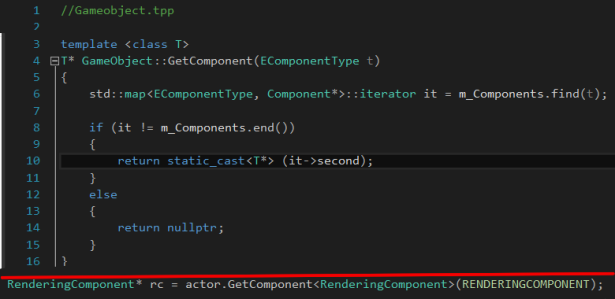
Let us say that the object can have a physics component, a rendering component, a sound component, a input component and a Script component. If we do not use templates we would need a GetFunction for all of these different components and we would need to create a new GetFunction for every new component, making the Entity container a big nest of GetFunctions. So to negate this we create a template GetFunction which returns a template pointer, so that the return can be safeguarded if it returns a null pointer.


By using a base class for the components (Component) we can store all the components in the same map with an identifier as either a string or an enum.

Templates Component


In the picture is the game objects GetComponent function and below that is a call for the function. You specify what kind of component you want between the < > signs and then call for the appropriate key (in this example RENDERINGCOMPONENT). Then the function can convert the component to the correct type by using a static_cast.

I am really interested to see how templates can be used further, they have great capabilities when it comes to reuse code and making the code more generic.

If you are inexperienced with templates I recommend you to read more about it as there is a lot of material on the internet about it. Here is something to get you started:

http://www.cplusplus.com/doc/tutorial/functions2/

That was all from me for the time being, if you have questions or thoughts about the topic leave a comment.

Board game analysis – Smallworld Underground

Game description

Smallworld underground is a game for 2-5 players for the age of eight and up. The objective is to have as many victory coins as possible at the end of a certain number of rounds. The game has 15 different races and 21 different powers that can be combined with those races.

To acquire victory coins you conquer land areas with your races unit tokens, you get one coin for each area in the end of your turn. You then get more coins depending on any modifiers you might have.

Each map has a set of areas that are inhabited by neutral units that is an enemy to everyone. When these neutral units are cleared, the player draws a loot token. These loot tokens represent either a popular place, for example an altar, or a righteous relic, for example a sword, that can be claimed by players. Both the popular places and the righteous relics have special abilities, such as free movement once per turn (the flying doormat) or sacrificing an in decline unit for three extra coins (the altar of souls).

During the players turn he can choose between two things, either play his turn and conquer areas or go in decline where you change in your race + power combination for a new one the next turn.

Player turn

At the start of your turn you use your minions to attack adjacent areas. Areas have different landscapes, and there are specific powers that have bonuses according to the different landscapes, such as gaining an additional victory coin per specified landscape.

Combat

To conquer areas you have to attack the area with your unit tokens. The requirement to conquer an area is two + any enemy unit tokens + any stationary extras (for example black mountains or fortress). If there are enough units you will conquer the area and no units will die or flee, the amount of units that was needed however cannot continue conquering areas. If there are not enough units the player may still attack with a minimum of one unit, the player throws a dice with three sides with a number on it. The number represents any extra units that may fill the gap to be able to conquer. If the fight fails however the player must put one of the units back into the box, the rest flees back to the origin area.

Go in decline

A player can choose to buy a new race + power combination and then you go into decline. Your previous race is left behind with only one unit on each area and the next turn you are allowed to buy a new race from six different that is on the board. When a race + power combination is bought a new combination is displayed on the board, so that there are always six different combinations on the board. The player then gets to use the new races units to attack with while their previous race stands still defending the areas they are in.

There is however a limit to how many races you may have in decline and that is one, if you go in decline two times the other declining race is discarded from the board and the areas become unoccupied.

End of the last round

In the end of the last round each player counts their coins, which they have held hidden until now. The one with the most coins in the end is declared the winner.

Best and worst sides

Victory coins

The victory points are the biggest part of the game, since it is what you need to win in the end. Victory coins are awarded after the players turn, how many you are rewarded depends on how many areas you are occupying and what different modifiers you control. Modifiers include +1 coin for a certain region, +1 coin for every set of regions, +1 coin for every black mountain and so forth. The most important part of the victory coins is that they were not to be public until the end of the last round where everyone counted their coins and the winner was revealed.

Races + powers combinations

As there are 15 different races and 21 different powers there are 315 combinations that can occur, giving the game a great deal of replay value. Some of the powers might seem similar, like the ones that increases the coin rate of the areas, but since the areas are on different places the game can still play out very differently. The power and race combination is what decides what kind of strategy you are going to use throughout the game, an example we had when we played the game was the race “Drow”, it gets an additional coin for every land area that do not have areas adjacent that are occupied by anything else than the drow race (including in decline races). By just holding about six to seven areas that player got more than a player that had ten areas or even more. This might seem like an overpowered situation, but the player only have a set amount of units to work with when they play each race, and drow had nine units to use while for example mummies had fifteen.

Different maps

There is a different map for every amount of players that is playing the game. For example there is a map for two players, one for three players etc. They all had a similar layout, but it gives the game even more replay value as you can still play the other maps even if you are not the recommended number of players.

Number of rounds

When playing the game you notice quite quickly that there are very few rounds which mean that if you want to switch race you get punished hard, you lose an entire round when you do it and when you are playing five people there are only eight rounds. This gives the rest of the players more time to conquer areas or farm coins.

Core game system

The core game system in the game is the victory coins. They are present in almost every part of the game. It decides how you want to play each round to maximise the effect of every move. The coin system is affected by how many areas the player have, if the player have any modifier such as the mining power (+1 coin for every mining area being controlled), and if the player is controlling any black mountains it is rewarded with one coin each. An important thing to not about the system is that players need to understand it in order to be able to win, and since it is so simple it is easy for players to grasp it.

The most interesting system

The most interesting system in Smallworld Underground is the race and power system. It almost always guarantees that each play session plays out differently, especially with the ability to switch races midgame. Because the race pieces are scrambled and given a random power in the start of the game, and the players are only aware of six of these at any given time in the game. The combination that you chose in the start of the game decides you initial strategy considerable.

For example in the first play through I started with the drow race and the mining power which made me look for a secluded area with at least one mining area. When I found it I moved my army to that position and conquer areas in a safe line, making sure that I do not have any adjacent enemies at the end of my turn, maximising the potential as best I could of the drow race.

Target audience

The box says that the game is aimed towards player with the age of eight and above, however I do believe that you want to be at least ten or eleven to get the most out of the game. With all that is going on when you have different races, powers and social interaction between the players. The social interaction that occurred is similar to that of Risk and Dust where players form alliances and try to keep the players they think are in the lead in check. Which is not a necessarily a feature in the game, however if a player want to make the most of the game it is an intriguing part of the gameplay.

I would recommend the game for anyone that have played the game Risk and want to try something similar but with enough differences to be considered a different game.

Summary

The game is very interesting with the race and power mechanics, every play through felt different and there were new things to try out every time. Even though it felt like it was too few rounds, the game was intense from start to finish. The games mechanics makes it clear what you want to do in order to win the game. The simply idea of having the most coins in the end is easy to grasp and makes sure that everyone is on what they need to do in order to win.

The box says that it is aimed for player at the age of eight and up, however I do believe that there is a bit more restrictions than this. Since the game involves a lot of planning the suggested player should at least have an interest in playing strategy games. I would recommend the game for players that have played and enjoyed games such as RISK or Dust.

Board game analysis – Dust

Introduction

During the course Advanced game design we were split into groups to play and analyse a board game. Our group chose the strategy game Dust.

Game description

Dust is a board strategy game, for two to six players, similar to RISK where your objective is to hold key locations on the game board which give victory points and the first to a set amount of victory points win. To do this the players have different cards and units to their disposal. The key locations are power sources and capitols. However there is also majorities that give victory points, the one with the most land areas, sea areas and production centers have a majority in the given category land, sea and production.

A round in the game is broken down into three parts, the Initiative step, the player turn and the victory point phase.

Initiative step

Unlike many other board games the order of which the players play their turns are not set from the start. The order is determined every new round by the players. They all put down a card facedown and then show them at the same time, the one with the highest combat value is the first to start, if there is a tie it will be determined by the movement value and then the production and then there is a number of stars in the bottom of the card to act as a tiebreaker.

When the order is set the players turn begins.

Player turn

The player turn is composed of three different phases, the production phase, the movement phase and the combat phase.

Production phase

During the production phase the player calculated how many production points that are given that turn. These production points are used to buy units, cards and production centers.

Movement phase

During the movement phase they player is allowed to move as many times as the movement value on the card that was played during the Initiative step. A movement is considered to be when you move unit(s) from one area to another, without picking up or dropping off units during the move. The areas need to be connected by friendly forces to be able to make a movement that is longer than one area.

Combat phase

The combat phase is the part where the player attacks other hostile forces to conquer new areas. The player may attack as many times as the combat value on the card that was used during the initiative step.

During a battle there are a few things to consider.

  • Who has tactical supremacy?
  • What is the combined combat power of the units?

Some units have a tactical supremacy value and the one with the most combined supremacy throws their dice first. Each combat power is equal to a dice throw, so say you have 15 combat power that gives you 15 dice throw before it is the opponents turn to throw.

Victory point phase

After every player has played their turn the game moves onto the victory point phase.

The victory point phase is a calculation of how many points each player has accumulated during the round and then moves a tank as many steps as the points the accumulated on a victory point track.

A point is given for each power source the player have and for every capitol the player controls. If they player holds the most land areas the player gets a token for land majority, and the same goes for sea majority. There is also a production majority which is given to the player with the most production centers.

Best and worst sides

The best side of the game was how the game handled the victory, as it was based on points that were accumulated every round it prevented stand stills. A game session could not go on forever as everyone always gets a bit closer to the end during each turn.

There is also a lot of strategic thinking outside of where you put your units, such as what card you play during the initiative step, how you compose your armies according to what cards you have and if you want to focus on sea units or land units. This really makes it feel like the most cunning person has the upper hand throughout the game, and not just the one with the best dice rolls in battles.

The worst side of the game was that it felt overly complicated. It felt as if the developers were trying to combine a computer game with a board game, there are a lot of rules and it felt as if they all had exceptions during some point of the game.  It seemed that the developers wanted to have a computer handle all the different rules for the players and telling them when they were allowed to do what and when what they were doing was no longer allowed. They already have two different game modes, but it lack easier game modes that gradually introduce you to game mechanics.

Core game system

I believe that the core system for Dust is the card system, because they determine how you are going to play during you turn. The cards have two different usages, one is their special ability. These varied a lot so I will only give a few examples. One would be used when one of your units died in battle and you used a card that gave you the ability to roll a die for every unit that was killed to see if you could spare its life and retreat with it instead. Another card would give the ability to nuke a city with three dice with the possibility of destroying three units from the area. This card could also ignore the priority system that is used in battles, which will be explained later. There is also a card that doubles the combat power of every aerial unit in a battle, which can be the basis for whole strategy involving planes.

The other usage the cards had was the initiative phase where you used a card to determine the player order and how many actions you were allowed to make during your turn. The card determined how many movements and battles the player could use as well as how many extra production points the player could use to produce units.

The most interesting system

I think that the most interesting system was the combat system because there are several ways to go about composing armies. The combat system created a lot of depth to the game, without I feel that it would have been too similar to risk.

In the game there are four land units and one sea unit. The land units consist of tanks, mechs, fighter planes and bomber planes, the sea unit is a submarine. When a unit dies in combat the game has a priority to what unit is allowed to die, if there is any tanks they must die before the mechs can die and if there is fighter planes they must die before the bomber planes can die.

The only unit that does not have a tactical supremacy value is the tank, and it is also the cheapest unit with a production cost of two while the fighter plane has the same combat stat but with a tactical value of one for the production cost of three. Since you always want to have tactical supremacy in battles this makes for some tough decision making when buying units. If you do not have tactical supremacy in battles it is likely that you are not even allowed to roll the dice, as the opponent can wipe out your units before it is your turn. There were several scenarios where one player had a ton of tanks but no tactical supremacy and got wiped out by a handful of mechs or tanks plus fighter planes.

Target group interpretation

On the box it says that the game is for the age of twelve and up, and I agree with this due to the fact that the rules can become very complex. During our game sessions we looked in the rulebook almost every round due to the rules being hard to interpret or that we had seen an exception to a rule and needed to find the reference to it. I believe that since the game is a lot about planning the younger audience might not like the slow pace compared to the faster pace in most other board games.

I would recommend this game to people that enjoy strategic thinking and have the patience to read through the rulebook several times to understand the rules and all its exceptions. Since the rulebook can be hard to interpret I would also suggest that the players are at least twelve years old and have a firm grasp on the English language.

Summation

The game is very complex and confusing. However this is both advantageous and disadvantageous. It creates a depth to the game which allows for a lot of strategies and it does that while still maintaining an acceptable game length.


Though since it is has a lot of rules and all rules seem to have an exception during some point of the game it makes for far too much confusing while playing the game and you find yourself looking more in the rulebook than at game during your initial play sessions.

Since the game already has two game modes I do not understand why they did not include an “introductory” or “tutorial” mode where the game is simplified to the point where it includes most of the systems but takes away all the variation so the complexity is minimised.

Simple AI

Hello dear readers,

What is a PvE¹ game if there is no AI²? Even if the AI is fairly simple it will still be better than no AI at all, if nothing else there will be a few laughs about the behaviour of the NPC³.

So in our game we have three distinct enemies:

  • The Water enemy which is aiming directly at you, or slightly forward from your direction
  • The Fire enemy, which is aiming slightly above you and slightly below you.
  • The Wood enemy, which is charging right at you, trying to smash your character right out of the screen.

A more In-Depth description of the behaviours would be:

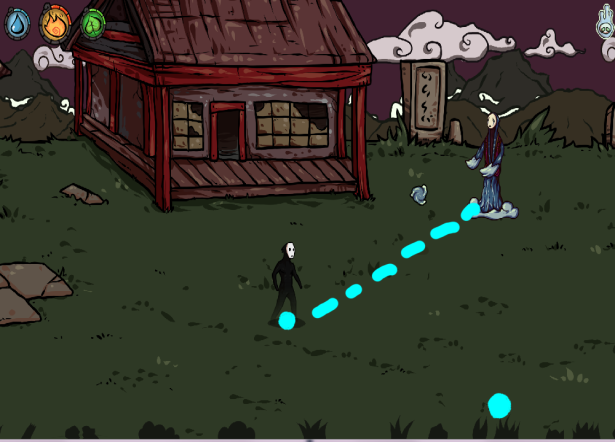
The Water enemy is going to move to either the top or the bottom of the screen, whichever that is the closest. After that it will begin to fire a projectile each N seconds.

Where the AI will move (if it has not reached said positions already) towards where the enemy is located right now and the dot in the bottom. While simultaneously firing at the players hitbox center with a certain time interval.

waterAI

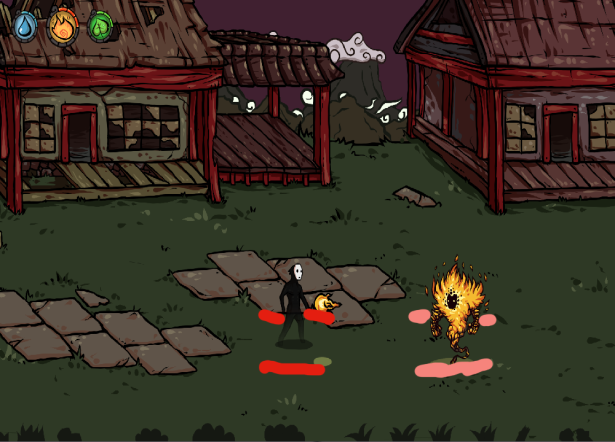
The Fire enemy is going to walk to the players top Y or bottom Y position, whichever that is closest, and then fire each N seconds.

In this picture you will see that the fire enemy will move towards the pink lines, and then start firing with a certain time interval.

FIREAI

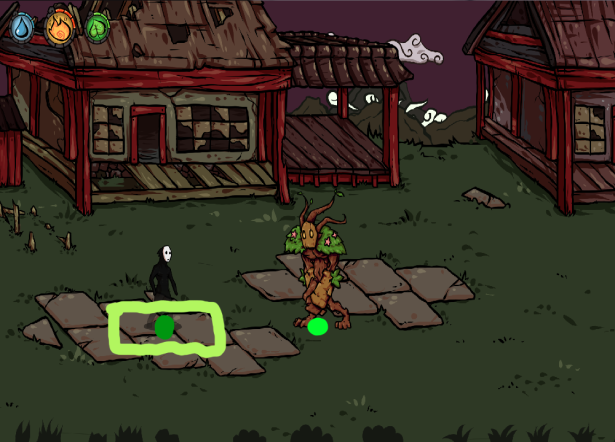
The Wood enemy is going to walk to a point right of the player, until it gets within the players hitbox’s Y position. When it does it will charge at the players X coordinates and it will attack when it is able to reach the player with a punch.

The light green at the bottom of the wood enemy is the first coordinate that the wood enemy is charging at. This is to simulate a form of “Interception”, where the enemy is trying to run infront of you and then smash right at you.

When the enemy then gets within the light green box around the player, it is going to punch the player. (Effectively moving its hitbox in the direction it is punching).

WOODAI


This is as far as we have gotten with the AI in our game, somewhat simple but it does create some challenging moments when we have all three different enemies present at the same wave.

Have a good day to you all and good luck with your future endeavours!

1.

PvE stands for Player versus Environment. Which basicly is you, as the player, against the computer, as the environment.

2.

AI, Artifical Intelligence, is a behaviour generated by a computer or equivalent from different algorithms.

3.

NPC is an abbrevation for Non Player Character. Which is, just as the name suggest, a character in a game that is not directly controlled by the player input.

Heads Up Display

HUD

Who does not like a good HUD¹?

You can show a lot with a HUD, and there is almost always a reason to implement it. Because you want to be able to give instant feedback to the player. Such as health increase or an increase of ammo.

However making an HUD is not always easy. It is easy to make it clumsy and irrelevant, with a lot of unnecessary information.

Though there is much to be said about HUD’s, the thing that I am going to talk about today is how we implemented our HUD into our game.

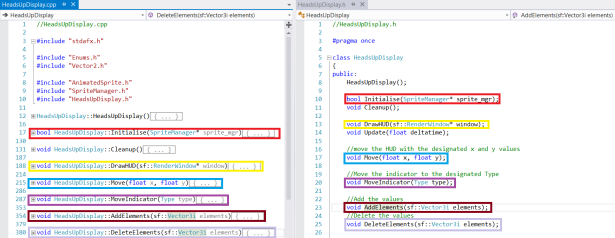
First a quick overview of the code:

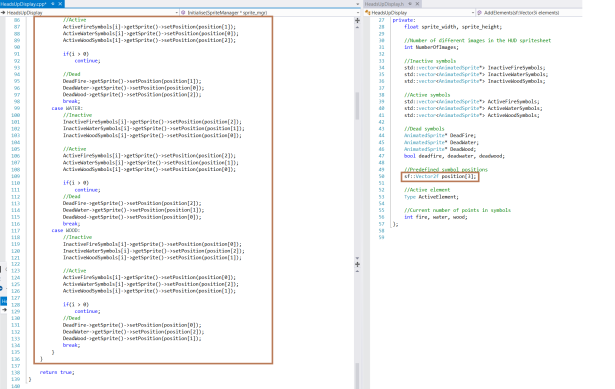
HUDOverview

  • INITIALISE:
    initialisestart
     

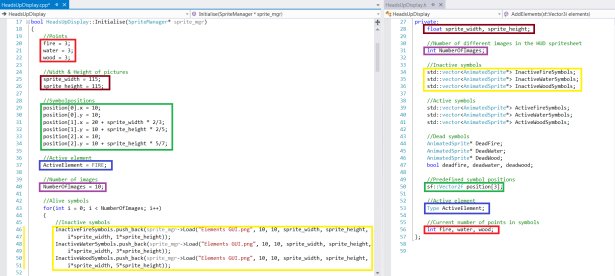
    The first things that happen in the initialisation function are as follows:
    (red) – Initialise the start values of life (the amount of points in each element)
    (brown) – Declare the width and height of each sprite in the HUD
    (green) – Declare the positions of the three symbols
    (blue) – Set the active element
    (purple) – Set the number of frames in the spritesheet
    (yellow) – Begin initialising the sprites for the inactive symbolsinitialisemiddle
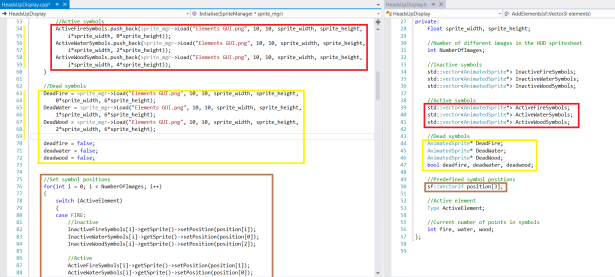
    () –
    Then when we are done with the inactive and active symbols, we initialise the dead symbols and their respective bool value.
    After that we begin to set their positions, this loop is used throughout the class and therefore I will not show it again.initialiseend

  • DRAWHUD:
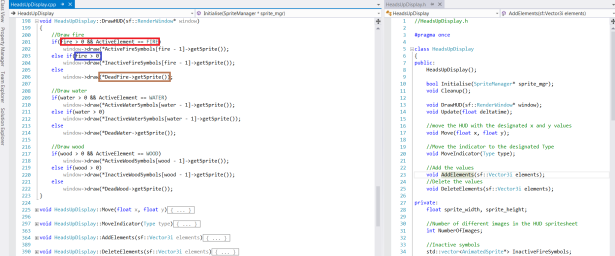
    DrawHUD
    The drawing portion of the class is quite simple.
    (red) – Check if there is more than 0 fire points, and if it is the active element: then we draw the corresponding active symbol.
    (blue) – Else if there is more than 0 fire points, we draw the inactive symbol
    (brown) – But if the element is dead we draw the dead symbol
    This is done the same with all the elements, fire, wood, water.
  • MOVE:
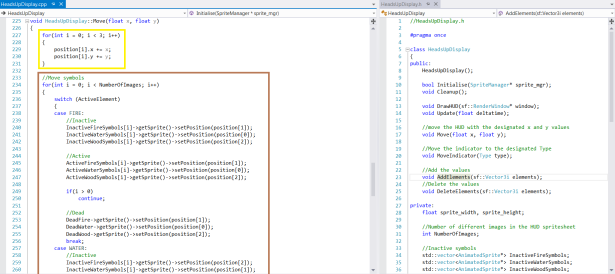
    Move
    The way we move the HUD is quite simple, we take the difference between the cameras last position and its current position and pass it through to the HUD:s Move function. These X and Y values are then added to the positions. After that we use the SetPosition loop to change the position of the symbols.
  • MOVEINDICATOR:
    MoveIndicator
    The way we move our current indicator is that we set the active Type (fire, water, wood) to that of the player.
  • ADDELEMENTS:
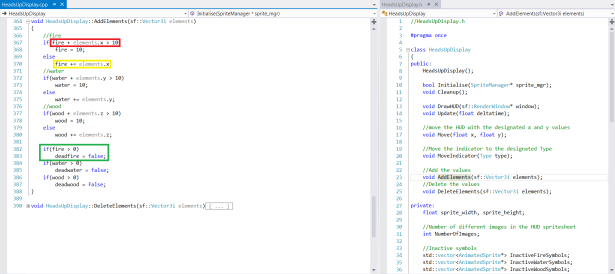
    AddElements
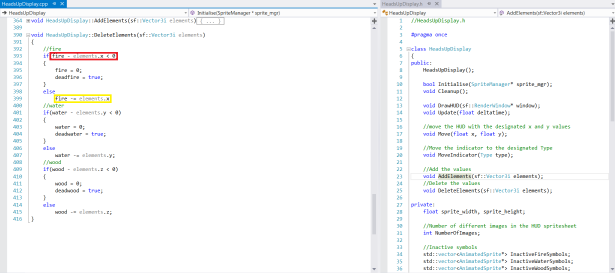
    The way we keep track of the elements is also quite simple. We simply send the amount of elements that we are going to add in a Vector3i² where we have the number of Fire (x.value), Water (y.value) and Wood (z.value) that we are going to add.
    (red) – If the amount of elements that are going to be added together with the number of elements that are currently available are greater or equal to ten (maximum number of elements) we set it to ten.
    (yellow) – Else we just add the number of elements to the current element
    (green) – If we are above 0 in the set element, we set the dead state to false
  • DELETEELEMENTS:
    DeleteElements
    This functions does much the same as the AddElement() function, just backwards.
    (red) – If you subtract the current elements with the number of elements to be subtracted and that becomes less or equal to zero. Then you set that its death state to true and its value to zero.
    (yellow) – Otherwise you simply subtract from the value of the elements.

Well that is our HeadsUpDisplay class in a nutshell!

1. HUD stands for heads up display, which is a display showing essential information that is helpful throughout the course of the game. Often including a indicator of health and ammo etc.

2. Vector3i is a variable that defines a point in a three dimensional grid, with an X, Y and Z value.

ConfigManager – Reading from files

ExampleLayout

Hello dear readers,

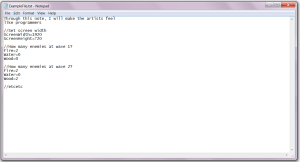
Today I am going to discuss some about my latest contribution to our game project. The ConfigManager, which is a part of the program which keep in mind all the files that have been read and what lines they contain.

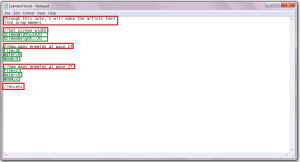
I will illustrate how it works with an alteration of the picture above.

LineCheck

PSEUDO CODE

Red lines are ignored.
Green lines are stored in a std::vector¹.

The lines that are stored in the vector is then split at the “=” sign. With the different sides of the “=” sign being different variables.
Left side is the Key variable.
Right side is the Value variable.
For example:
ScreenWidth=1080
Where ScreenWidth is the Key, and the 1080 is the Value.

CODE PART

ConfigmanagerhInitialise

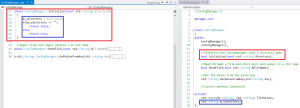
To properly initialise (red boxes) the ConfigManager, I want to set a default directory, from which the files are retrieved. Invalidating any stray files and keeping a clear structure. To do this we look at the blue boxes, where a std::string² variable is declared in the header file and then given a value through the Initalise parameter.

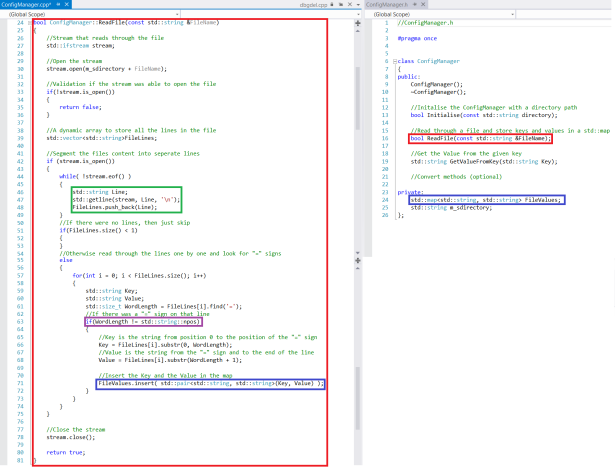
ReadFile

This is the main function (Red) of the ConfigManager, a function for reading a file and store the important parts of it in a dynamic array.
The first part of ReadLine() is just initialisation of variables that is required during the process. However when we reach the green box, that is when we actually do something. Since we start to read through the entire file, While(not end of file), and then we push every line into the temporary vector. 

Then there is not anything interesting until we reach the purple box, where we check if the ‘=’ sign is the last character. If it is not, then we add the Key and the Value to a std::map³. Both which are of type std::string.

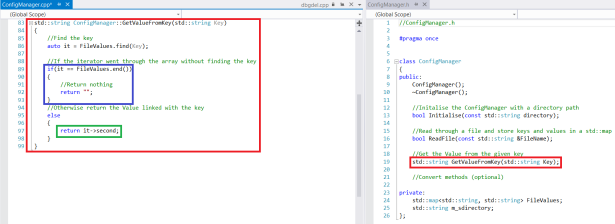
GetValueFromKey

The last part is how to retrieve the different values. This is done through std::map’s own find() function. Where the blue box see if the search went through all the keys and did not find the specific key. Though if it did, then it returns the value that is associated with the key.

This is a basic ConfigManager that reads simple input through a file. However it is limited to this exact syntax. Where there is no spaces between the Key and its Value.

WORD EXPLANATIONS

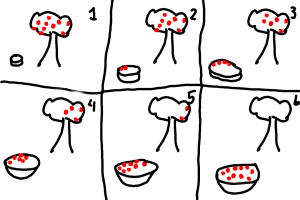
1. A std::vector is a dynamic array of objects. For example, if you have a basket (which would be the vector) and an apple tree with a lot of apples (the objects), and you tried to fill the basket with the apples. The basket would then change its size according to the number of apples in the basket, never allowing you to fill it completely. Illustrated in the series of pictures below.

Apples and the evergrowing basket

2. A std::string is an array of characters, forming a text string. Like “Hello World!”.

3. A std::map is a dynamic array that stores 2 values, a Key and a Value. Where you can retrieve the Value through finding the Key. Like an normal lock, if you do not have the Key, you can not open the lock.

The magic of Sound

Research

While a game can be great without sound, there is something magical within sounds that fill the athmosphere. Which is somewhat needed to give that stillful and lonely feeling that our game needs. With this motivation in mind I set out to create something that could handle all the different sounds in our game in a reasonable fashion.

The thought that came to mind where that we do not want to load the same sound file several time.

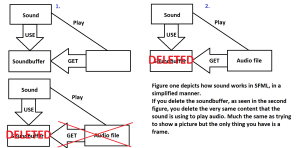
To solve this I first checked SFML:s documentation for Sound and Music, to get an understanding of how much support they have for sound and music. They turned out to handle Audio much the same way as they handle Sprites, and if you do not know how they handle Sprites you can read up on it here: http://www.sfml-dev.org/tutorials/2.1/graphics-sprite.php. With one important rule, the Soundbuffer that you attach to the Sound object need to exist as long as you want to use the Sound object, which is another thing that the SoundManager is needed for. To control the lifetime of the SoundBuffers. Depicted in the figures below.

howitworksfigures

When I knew this, it was an easy decision to make the SoundManager much the same way as I did our SpriteManager.

Overview – Initalise and Load

initialiseLoad

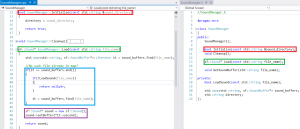
* Initalise() – Within the red fields you see the Initialise() function, which has the purpose of setting the path to the directory (giving the folder which contains the audio files).

* Load() – Within the turqouise fields is the definition and declartion of the Load() function, which is the main part of the SoundManager:s purpose. To load a specific file and returning a soundbuffer pointer, which in turn will be used by the entities to create sounds. Inside the light blue field is the check if the file has already been loaded, more on the loading in the next section. If it is already loaded it will be loaded into a SoundBuffer pointer, as seen in the purple box. This SoundBuffer pointer is then returned to the part of the code that called for the function.

Overview – LoadImage and Cleanup

CleanLoadSound

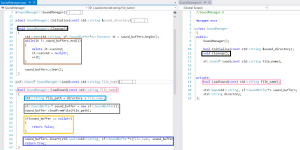
* LoadImage() – The pink boxes contain the definition and declaration of the LoadImage() function, which sole objective is to load a sound file into a sf::SoundBuffer and insert that in the dynamic array of Soundbuffers. This is achieved by first setting a complete file path, Cyan box, and then creating a local SoundBuffer pointer to which you use the “LoadFromFile()” function that is built into SFML, the Grey box. The next step is to make sure the file was actually loaded, the Yellow box, with a simple check if the pointer was nullified or not, and if it is nullified you return false (since the file could not be loaded). The last step is to insert the SoundBuffer in the dynamic array and then return true, the blue box.

* Cleanup() – The black box is the destruction of the class, this is where the dynamic array is cleared and all the pointers are deleted and set to nullptr. All this is done in the brown box. It iterates through the entire array and delete the pointers one by one and sets them to nullptr. After this the only thing left is to use the “Clear()” function to the std::map to reset the dynamic array.

Then voilà a functioning SoundManager.

Animation

“Animation, switching between pictures in a spritesheet, should not be that hard.”

A simple statement, however when I started working on our AnimationManager I realised just how wrong it was. At least in my case, where I tried to create an “Animation” class and then a “AnimationManager” to hold all the different Animations.

My original thought was that in the AnimationManager, there would be a vector with all the different animations, and that all entities would then have their own little map with their individual animations (which they fetched from the AnimationManager), just so the program would not need to load all the animations over and over again.

Well the thought was not that bad and not too far off what I ended up with, however there was a little problem with the loading of animations. Since it needed the SpriteManager to actually load the images, and I did not want to include the SpriteManager all over the place.

HOW IT IS DONE, SDL STYLE

So I went back to thinking of ways to do it. Then I got a tip from a fellow classmate to check out our teachers SDL animation class, since I had not looked at it before I thought it might not be a dumb idea to get some inspiration.

SDLanimation

This is a overview of the SDL animation. Where you have a “Animation” class in the form of “AnimatedSprite”, and this class stores one animation. This animation is a bulk of frames with different X and Y values as well as a width and height. These “Frames” represent different squares on the spritesheet which will change the appearances of the sprite by moving the texture coordinates on the spritesheet, so that it fetches a new picture.

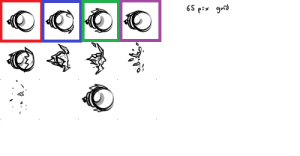
For example:

frameexample

Frame 1 (red) will have coordinates:
X = 0
Y = 0
Width = 65
Height = 65

Frame 2 (blue) will have the coordinates:
X = 65
Y = 0
Width = 65
Height = 65

And so on, where you increment the frames with the width and height of the previous frame. Well I took this concept and adjusted it to fit into our game and with the media library SFML.

HOW IT IS DONE, ZWÖLF STYLE

Here is a overview of our Animation system:

AnimspriteEntity entitymgrSpritemgr

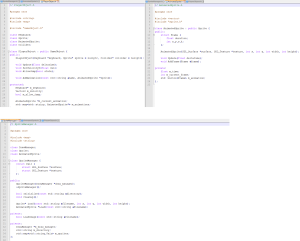
Our system is based on the fact that every entity has a map of animatedsprites, with an enum as key. Cleverly named “AnimationName”. This map of animations is filled in the EntityManager (which already have a pointer to the spritemanager), during the “AttachEntity()” function. Where the “AddAnimation()” function is called to return an AnimatedSprite pointer.

The parameters to the “AddAnimation()” function is:

The filename for the spritesheet
The number of frames in the animation
How many columns there is in the animation (so that the spritemanager know when to break for a new row)
The width & height of the frame
The startposition in X and Y (on the spritesheet)

AnimspriteSpriteMgr

In these functions you see how the creation of the AnimatedSprites are actually processed, and why we used those previous parameters in the EntityManager. They are used within the fields of the SpriteManager, where we check if we have already loaded the spritesheet (we do not want to load the same texture several times). Then within the green field in the SpriteManager we create a frame and add it to the local AnimatedSprite pointer through it’s AddFrame() function. Then when the loop has reached the number of frames we wanted, it returns the local AnimatedSprite pointer.

In the AnimatedSprite we find another important function, the Update(). This function is essential to be sure our animation actually becomes an animation, since this is the function which changes the frame when the duration of the frame has been reached. With the “SetTexture()” function from the sf::Sprite class.

Well this would be all, if there is any unclarities please comment with any questions and I will be sure to answer in due time.