Simple AI

Hello dear readers,

What is a PvE¹ game if there is no AI²? Even if the AI is fairly simple it will still be better than no AI at all, if nothing else there will be a few laughs about the behaviour of the NPC³.

So in our game we have three distinct enemies:

  • The Water enemy which is aiming directly at you, or slightly forward from your direction
  • The Fire enemy, which is aiming slightly above you and slightly below you.
  • The Wood enemy, which is charging right at you, trying to smash your character right out of the screen.

A more In-Depth description of the behaviours would be:

The Water enemy is going to move to either the top or the bottom of the screen, whichever that is the closest. After that it will begin to fire a projectile each N seconds.

Where the AI will move (if it has not reached said positions already) towards where the enemy is located right now and the dot in the bottom. While simultaneously firing at the players hitbox center with a certain time interval.

waterAI

The Fire enemy is going to walk to the players top Y or bottom Y position, whichever that is closest, and then fire each N seconds.

In this picture you will see that the fire enemy will move towards the pink lines, and then start firing with a certain time interval.

FIREAI

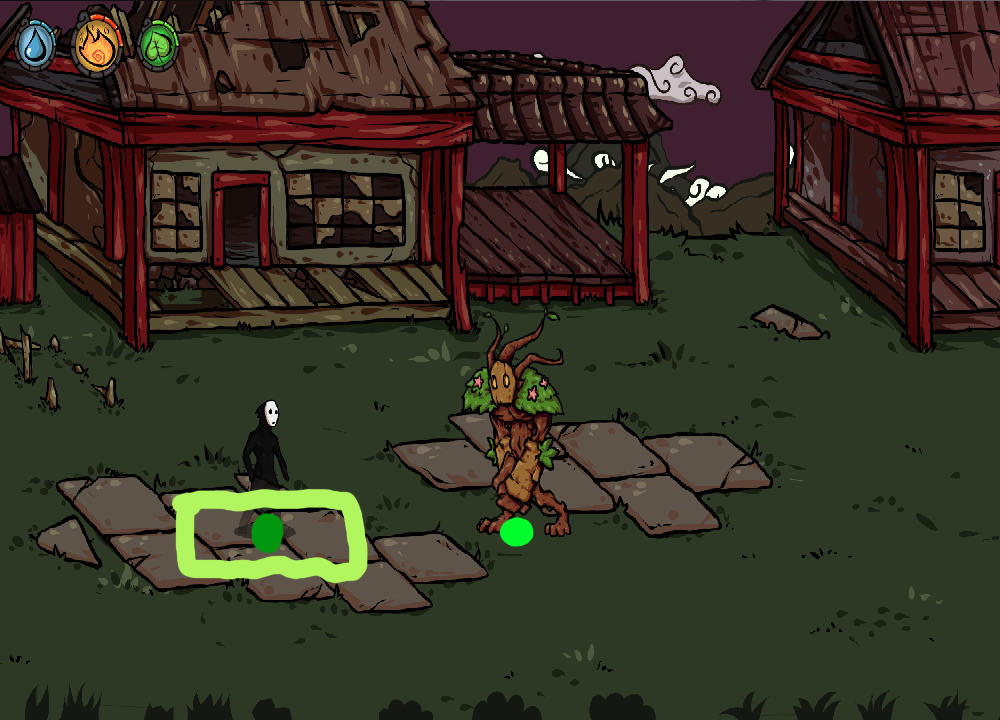
The Wood enemy is going to walk to a point right of the player, until it gets within the players hitbox’s Y position. When it does it will charge at the players X coordinates and it will attack when it is able to reach the player with a punch.

The light green at the bottom of the wood enemy is the first coordinate that the wood enemy is charging at. This is to simulate a form of “Interception”, where the enemy is trying to run infront of you and then smash right at you.

When the enemy then gets within the light green box around the player, it is going to punch the player. (Effectively moving its hitbox in the direction it is punching).

WOODAI


This is as far as we have gotten with the AI in our game, somewhat simple but it does create some challenging moments when we have all three different enemies present at the same wave.

Have a good day to you all and good luck with your future endeavours!

1.

PvE stands for Player versus Environment. Which basicly is you, as the player, against the computer, as the environment.

2.

AI, Artifical Intelligence, is a behaviour generated by a computer or equivalent from different algorithms.

3.

NPC is an abbrevation for Non Player Character. Which is, just as the name suggest, a character in a game that is not directly controlled by the player input.

Heads Up Display

HUD

Who does not like a good HUD¹?

You can show a lot with a HUD, and there is almost always a reason to implement it. Because you want to be able to give instant feedback to the player. Such as health increase or an increase of ammo.

However making an HUD is not always easy. It is easy to make it clumsy and irrelevant, with a lot of unnecessary information.

Though there is much to be said about HUD’s, the thing that I am going to talk about today is how we implemented our HUD into our game.

First a quick overview of the code:

HUDOverview

  • INITIALISE:
    initialisestart
     

    The first things that happen in the initialisation function are as follows:
    (red) – Initialise the start values of life (the amount of points in each element)
    (brown) – Declare the width and height of each sprite in the HUD
    (green) – Declare the positions of the three symbols
    (blue) – Set the active element
    (purple) – Set the number of frames in the spritesheet
    (yellow) – Begin initialising the sprites for the inactive symbolsinitialisemiddle
    () –
    Then when we are done with the inactive and active symbols, we initialise the dead symbols and their respective bool value.
    After that we begin to set their positions, this loop is used throughout the class and therefore I will not show it again.initialiseend

  • DRAWHUD:
    DrawHUD
    The drawing portion of the class is quite simple.
    (red) – Check if there is more than 0 fire points, and if it is the active element: then we draw the corresponding active symbol.
    (blue) – Else if there is more than 0 fire points, we draw the inactive symbol
    (brown) – But if the element is dead we draw the dead symbol
    This is done the same with all the elements, fire, wood, water.
  • MOVE:
    Move
    The way we move the HUD is quite simple, we take the difference between the cameras last position and its current position and pass it through to the HUD:s Move function. These X and Y values are then added to the positions. After that we use the SetPosition loop to change the position of the symbols.
  • MOVEINDICATOR:
    MoveIndicator
    The way we move our current indicator is that we set the active Type (fire, water, wood) to that of the player.
  • ADDELEMENTS:
    AddElements
    The way we keep track of the elements is also quite simple. We simply send the amount of elements that we are going to add in a Vector3i² where we have the number of Fire (x.value), Water (y.value) and Wood (z.value) that we are going to add.
    (red) – If the amount of elements that are going to be added together with the number of elements that are currently available are greater or equal to ten (maximum number of elements) we set it to ten.
    (yellow) – Else we just add the number of elements to the current element
    (green) – If we are above 0 in the set element, we set the dead state to false
  • DELETEELEMENTS:
    DeleteElements
    This functions does much the same as the AddElement() function, just backwards.
    (red) – If you subtract the current elements with the number of elements to be subtracted and that becomes less or equal to zero. Then you set that its death state to true and its value to zero.
    (yellow) – Otherwise you simply subtract from the value of the elements.

Well that is our HeadsUpDisplay class in a nutshell!

1. HUD stands for heads up display, which is a display showing essential information that is helpful throughout the course of the game. Often including a indicator of health and ammo etc.

2. Vector3i is a variable that defines a point in a three dimensional grid, with an X, Y and Z value.

ConfigManager – Reading from files

ExampleLayout

Hello dear readers,

Today I am going to discuss some about my latest contribution to our game project. The ConfigManager, which is a part of the program which keep in mind all the files that have been read and what lines they contain.

I will illustrate how it works with an alteration of the picture above.

LineCheck

PSEUDO CODE

Red lines are ignored.
Green lines are stored in a std::vector¹.

The lines that are stored in the vector is then split at the “=” sign. With the different sides of the “=” sign being different variables.
Left side is the Key variable.
Right side is the Value variable.
For example:
ScreenWidth=1080
Where ScreenWidth is the Key, and the 1080 is the Value.

CODE PART

ConfigmanagerhInitialise

To properly initialise (red boxes) the ConfigManager, I want to set a default directory, from which the files are retrieved. Invalidating any stray files and keeping a clear structure. To do this we look at the blue boxes, where a std::string² variable is declared in the header file and then given a value through the Initalise parameter.

ReadFile

This is the main function (Red) of the ConfigManager, a function for reading a file and store the important parts of it in a dynamic array.
The first part of ReadLine() is just initialisation of variables that is required during the process. However when we reach the green box, that is when we actually do something. Since we start to read through the entire file, While(not end of file), and then we push every line into the temporary vector. 

Then there is not anything interesting until we reach the purple box, where we check if the ‘=’ sign is the last character. If it is not, then we add the Key and the Value to a std::map³. Both which are of type std::string.

GetValueFromKey

The last part is how to retrieve the different values. This is done through std::map’s own find() function. Where the blue box see if the search went through all the keys and did not find the specific key. Though if it did, then it returns the value that is associated with the key.

This is a basic ConfigManager that reads simple input through a file. However it is limited to this exact syntax. Where there is no spaces between the Key and its Value.

WORD EXPLANATIONS

1. A std::vector is a dynamic array of objects. For example, if you have a basket (which would be the vector) and an apple tree with a lot of apples (the objects), and you tried to fill the basket with the apples. The basket would then change its size according to the number of apples in the basket, never allowing you to fill it completely. Illustrated in the series of pictures below.

Apples and the evergrowing basket

2. A std::string is an array of characters, forming a text string. Like “Hello World!”.

3. A std::map is a dynamic array that stores 2 values, a Key and a Value. Where you can retrieve the Value through finding the Key. Like an normal lock, if you do not have the Key, you can not open the lock.

The magic of Sound

Research

While a game can be great without sound, there is something magical within sounds that fill the athmosphere. Which is somewhat needed to give that stillful and lonely feeling that our game needs. With this motivation in mind I set out to create something that could handle all the different sounds in our game in a reasonable fashion.

The thought that came to mind where that we do not want to load the same sound file several time.

To solve this I first checked SFML:s documentation for Sound and Music, to get an understanding of how much support they have for sound and music. They turned out to handle Audio much the same way as they handle Sprites, and if you do not know how they handle Sprites you can read up on it here: http://www.sfml-dev.org/tutorials/2.1/graphics-sprite.php. With one important rule, the Soundbuffer that you attach to the Sound object need to exist as long as you want to use the Sound object, which is another thing that the SoundManager is needed for. To control the lifetime of the SoundBuffers. Depicted in the figures below.

howitworksfigures

When I knew this, it was an easy decision to make the SoundManager much the same way as I did our SpriteManager.

Overview – Initalise and Load

initialiseLoad

* Initalise() – Within the red fields you see the Initialise() function, which has the purpose of setting the path to the directory (giving the folder which contains the audio files).

* Load() – Within the turqouise fields is the definition and declartion of the Load() function, which is the main part of the SoundManager:s purpose. To load a specific file and returning a soundbuffer pointer, which in turn will be used by the entities to create sounds. Inside the light blue field is the check if the file has already been loaded, more on the loading in the next section. If it is already loaded it will be loaded into a SoundBuffer pointer, as seen in the purple box. This SoundBuffer pointer is then returned to the part of the code that called for the function.

Overview – LoadImage and Cleanup

CleanLoadSound

* LoadImage() – The pink boxes contain the definition and declaration of the LoadImage() function, which sole objective is to load a sound file into a sf::SoundBuffer and insert that in the dynamic array of Soundbuffers. This is achieved by first setting a complete file path, Cyan box, and then creating a local SoundBuffer pointer to which you use the “LoadFromFile()” function that is built into SFML, the Grey box. The next step is to make sure the file was actually loaded, the Yellow box, with a simple check if the pointer was nullified or not, and if it is nullified you return false (since the file could not be loaded). The last step is to insert the SoundBuffer in the dynamic array and then return true, the blue box.

* Cleanup() – The black box is the destruction of the class, this is where the dynamic array is cleared and all the pointers are deleted and set to nullptr. All this is done in the brown box. It iterates through the entire array and delete the pointers one by one and sets them to nullptr. After this the only thing left is to use the “Clear()” function to the std::map to reset the dynamic array.

Then voilà a functioning SoundManager.

Animation

“Animation, switching between pictures in a spritesheet, should not be that hard.”

A simple statement, however when I started working on our AnimationManager I realised just how wrong it was. At least in my case, where I tried to create an “Animation” class and then a “AnimationManager” to hold all the different Animations.

My original thought was that in the AnimationManager, there would be a vector with all the different animations, and that all entities would then have their own little map with their individual animations (which they fetched from the AnimationManager), just so the program would not need to load all the animations over and over again.

Well the thought was not that bad and not too far off what I ended up with, however there was a little problem with the loading of animations. Since it needed the SpriteManager to actually load the images, and I did not want to include the SpriteManager all over the place.

HOW IT IS DONE, SDL STYLE

So I went back to thinking of ways to do it. Then I got a tip from a fellow classmate to check out our teachers SDL animation class, since I had not looked at it before I thought it might not be a dumb idea to get some inspiration.

SDLanimation

This is a overview of the SDL animation. Where you have a “Animation” class in the form of “AnimatedSprite”, and this class stores one animation. This animation is a bulk of frames with different X and Y values as well as a width and height. These “Frames” represent different squares on the spritesheet which will change the appearances of the sprite by moving the texture coordinates on the spritesheet, so that it fetches a new picture.

For example:

frameexample

Frame 1 (red) will have coordinates:
X = 0
Y = 0
Width = 65
Height = 65

Frame 2 (blue) will have the coordinates:
X = 65
Y = 0
Width = 65
Height = 65

And so on, where you increment the frames with the width and height of the previous frame. Well I took this concept and adjusted it to fit into our game and with the media library SFML.

HOW IT IS DONE, ZWÖLF STYLE

Here is a overview of our Animation system:

AnimspriteEntity entitymgrSpritemgr

Our system is based on the fact that every entity has a map of animatedsprites, with an enum as key. Cleverly named “AnimationName”. This map of animations is filled in the EntityManager (which already have a pointer to the spritemanager), during the “AttachEntity()” function. Where the “AddAnimation()” function is called to return an AnimatedSprite pointer.

The parameters to the “AddAnimation()” function is:

The filename for the spritesheet
The number of frames in the animation
How many columns there is in the animation (so that the spritemanager know when to break for a new row)
The width & height of the frame
The startposition in X and Y (on the spritesheet)

AnimspriteSpriteMgr

In these functions you see how the creation of the AnimatedSprites are actually processed, and why we used those previous parameters in the EntityManager. They are used within the fields of the SpriteManager, where we check if we have already loaded the spritesheet (we do not want to load the same texture several times). Then within the green field in the SpriteManager we create a frame and add it to the local AnimatedSprite pointer through it’s AddFrame() function. Then when the loop has reached the number of frames we wanted, it returns the local AnimatedSprite pointer.

In the AnimatedSprite we find another important function, the Update(). This function is essential to be sure our animation actually becomes an animation, since this is the function which changes the frame when the duration of the frame has been reached. With the “SetTexture()” function from the sf::Sprite class.

Well this would be all, if there is any unclarities please comment with any questions and I will be sure to answer in due time.

EntityManager, collision is a breeze

It was a little while ago that I finished the Entitymanager for our spaceshooter project. However today I am going to explain how it works and why it makes collision so much easier for our game.

Lets first look at our Entitymanager.h

Entitymanagerh

Which includes a vector of Entity pointers, a SpriteManager pointer and a map that will control collision.

First there is the constructors, which are not really important at this point. One of them contains a pointer to the sprite manager, however that is for animations. Which will be discussed next week.

Secondly there is the Init() function which contains these things at the moment:

Initfunction

Which is a collisionmap that secures that we do not do any unnecessary collision checks, this will be more clear when we get to the update function. However the map consists of a pair of Alignments as a key and a int value thereafter. The “Alignment ” type is an enum which describes what sort of object an entity is.

The latter part of the functions is where the player is created (making sure that the player is at position zero). Setting its position, adding its animationer, start the entities initialising function and set the shooting delay.

Thirdly there is the AttachEntity function:

AttachEntity

Which does the same as the ladder part of the Init() function, but with a switch case with Alignment as parameter. Making it easy to add another sort of entity.

The next function is almost the same as the AttachEntity, but with Projectiles instead. Since they need to know what direction they are flying in.

AttachProjectile

Then there is a cleanup function which is not that exciting. It only goes through the vector and deleting the pointers and setting them to null.

However the next segment is the most interesting one, the “Update()” function:

Update1 Update2

The first thing it does is to update the objects, and then it checks through the rest of the objects in the vector. If both objects have colliders and the objects alignments are in the collisionmap, then it checks for the collision. Meaning that instead of all objects checking against all objects (checking n to the power of two collisions) it only checks all friendly to all enemies. Meaning that if I had 1 friendly player and 99 enemies, I would check 99 collisions, instead of 10 000 collisions. Not a bad trade.

Then there is the projectile creation part, it would feel quite self-explanatory, as I check if the required delay has passed since the last shot and if the shoot button has been pressed. It is only implemented for the player at the moment but it will be of the same premises that the AI shooting will be built upon.

And then there is the last part where I clean up the entities which have been flagged for death.

Well that would be all, if you got any questions feel free to post them.