
Who does not like a good HUD¹?
You can show a lot with a HUD, and there is almost always a reason to implement it. Because you want to be able to give instant feedback to the player. Such as health increase or an increase of ammo.
However making an HUD is not always easy. It is easy to make it clumsy and irrelevant, with a lot of unnecessary information.
Though there is much to be said about HUD’s, the thing that I am going to talk about today is how we implemented our HUD into our game.
First a quick overview of the code:

- INITIALISE:
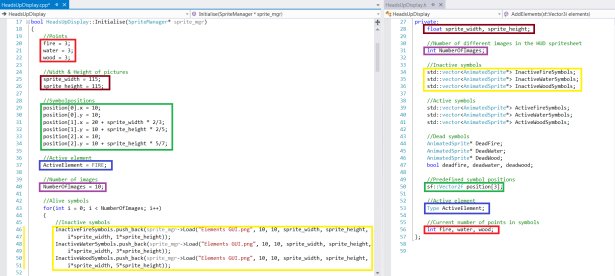
The first things that happen in the initialisation function are as follows:
(red) – Initialise the start values of life (the amount of points in each element)
(brown) – Declare the width and height of each sprite in the HUD
(green) – Declare the positions of the three symbols
(blue) – Set the active element
(purple) – Set the number of frames in the spritesheet
(yellow) – Begin initialising the sprites for the inactive symbols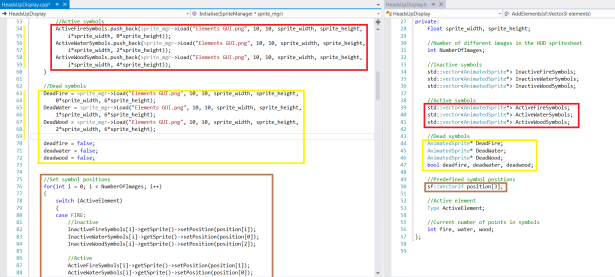
() –
Then when we are done with the inactive and active symbols, we initialise the dead symbols and their respective bool value.
After that we begin to set their positions, this loop is used throughout the class and therefore I will not show it again.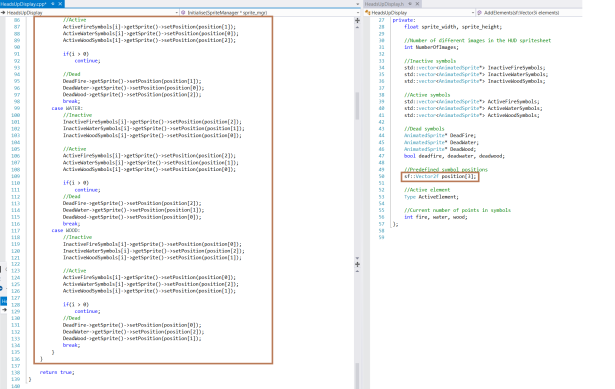
- DRAWHUD:

The drawing portion of the class is quite simple.
(red) – Check if there is more than 0 fire points, and if it is the active element: then we draw the corresponding active symbol.
(blue) – Else if there is more than 0 fire points, we draw the inactive symbol
(brown) – But if the element is dead we draw the dead symbol
This is done the same with all the elements, fire, wood, water. - MOVE:
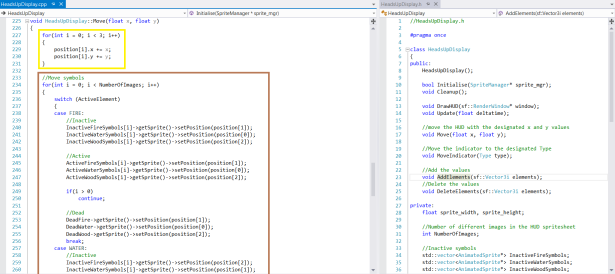
The way we move the HUD is quite simple, we take the difference between the cameras last position and its current position and pass it through to the HUD:s Move function. These X and Y values are then added to the positions. After that we use the SetPosition loop to change the position of the symbols. - MOVEINDICATOR:

The way we move our current indicator is that we set the active Type (fire, water, wood) to that of the player. - ADDELEMENTS:
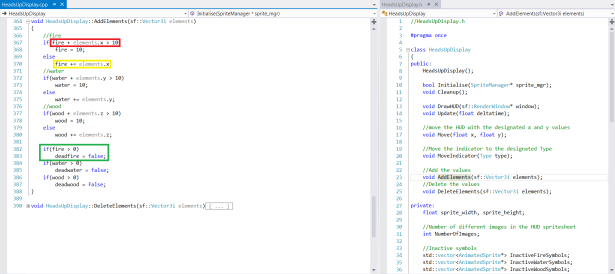
The way we keep track of the elements is also quite simple. We simply send the amount of elements that we are going to add in a Vector3i² where we have the number of Fire (x.value), Water (y.value) and Wood (z.value) that we are going to add.
(red) – If the amount of elements that are going to be added together with the number of elements that are currently available are greater or equal to ten (maximum number of elements) we set it to ten.
(yellow) – Else we just add the number of elements to the current element
(green) – If we are above 0 in the set element, we set the dead state to false - DELETEELEMENTS:
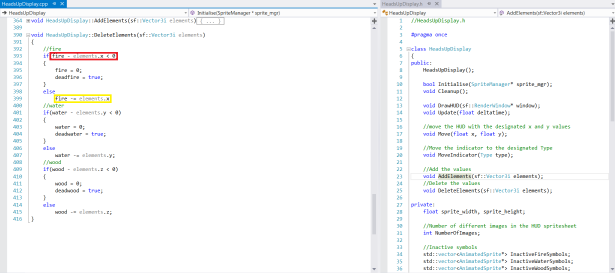
This functions does much the same as the AddElement() function, just backwards.
(red) – If you subtract the current elements with the number of elements to be subtracted and that becomes less or equal to zero. Then you set that its death state to true and its value to zero.
(yellow) – Otherwise you simply subtract from the value of the elements.


Well that is our HeadsUpDisplay class in a nutshell!
1. HUD stands for heads up display, which is a display showing essential information that is helpful throughout the course of the game. Often including a indicator of health and ammo etc.
2. Vector3i is a variable that defines a point in a three dimensional grid, with an X, Y and Z value.

Well, that seems like a well-thought system and execution of it. There were only a couple of things that I had to think twice about in all this code:
1. You create things like DeadWood, DeadFire and DeadWater with easy to read names, but the positions are in an array where you need to remember what “ID” that corresponds to what. I don’t mind the usage of either of them, but I’d prefer it if they aren’t mixed to avoid confusion. In the third picture they are in a different order (1 -> 0 -> 2), so I guess I wasn’t the only one that would have gotten a little confused with them ^^
2. That was a really interesting way of using Vector3i. At first I was confused if you used 3D-elements of some sort in the game (which I doubt we were allowed to use in the first place), but then it all got cleared up. There’s probably one or two persons out there that would rip their hair for using it like that, but I there are probably someone else that finds it genius. Also here it seems like you got a hard time deciding which one that is the “first” element since it doesn’t seem to match up with the IDs of the positions from earlier.
3. I guess you aren’t going to use any other types of HUDs with this, since it seems to be only for the three elements? I haven’t seen that much of the game, so I don’t really know how all the HUDs would play out when seeing them.
(4. I can’t open the full-size versions of all the pictures except the first one :/)
Good job nevertheless, and good luck!
Hey and thanks for the feedback,
I have changed quite a lot of the code since I wrote this post, to try an optimise it. I should probably have mentioned that this is a not a good way to go around making a HUD, and you are correct in that I will surely not reuse this code for a future HUD.